Shenzhen Alu Rapid Prototype Precision Co., Ltd.
Industry News
- Home
- News
- How to fix short shot injection molding?
A short shot defect occurs when the molten plastic fails to completely fill the mold cavity, resulting in incomplete parts with voids, thin walls, or missing sections. This can compromise the part's structural integrity, appearance, and functionality, leading to increased scrap rates and production costs. Identifying and addressing the root cause is key to resolution, as short shots often stem from a combination of material, machine, and mold-related factors.
Common Causes of Short Shots
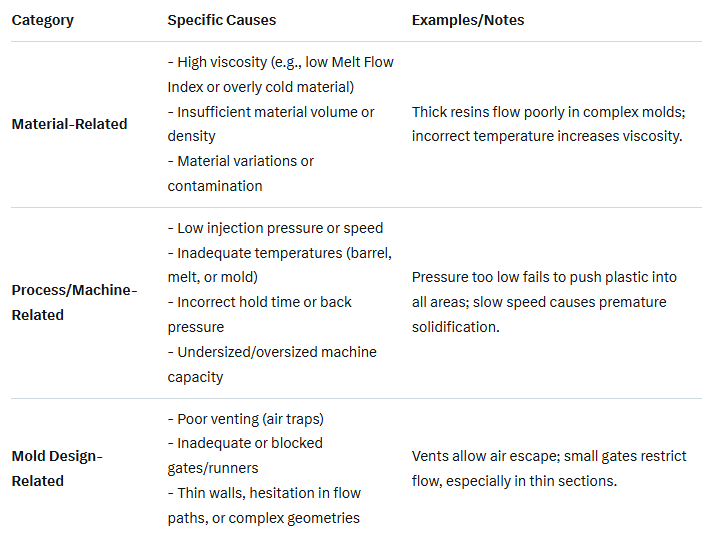
Short shots can arise from several interconnected issues. Here's a breakdown of the primary causes, categorized for clarity:

How to Troubleshoot and Fix Short Shots
Troubleshooting should follow a systematic approach: Start with a "fill-only" test (disable second-stage pressure to observe flow patterns), inspect the part visually and by weight, then adjust one variable at a time while monitoring results. Below is a step-by-step guide to common solutions, prioritized by ease of implementation.
1.Increase Injection Pressure and Speed
Gradually raise first-stage injection pressure to force material into remote or thin areas of the mold, ensuring it doesn't cause flashing (excess material). Similarly, boost injection speed to prevent cooling before full fill, but avoid excessive speed that traps air.
Raise barrel/melt temperature to reduce viscosity and improve flow, and increase mold temperature to slow solidification. Start with small increments (e.g., 5-10°C) to avoid degradation.
2.Ensure Adequate Material Supply
Verify shot size matches the mold volume (avoid <25% machine capacity). Check for consistent material feed and density by adjusting back pressure or screw speed.
3.Improve Mold Venting and Cleaning
Clean vents, gates, and runners to remove blockages. Enlarge or add vents (especially at the end of flow paths) and use ejection pins for air release. If persistent, consider redesigning gates for better placement and size.
4.Review and Adjust Hold/Pack Settings
Extend hold time and increase pack pressure to compensate for shrinkage as the part cools. Use process monitoring (e.g., pressure alarms) to maintain consistency.
5.Evaluate Material and Mold Design
If process tweaks fail, test a lower-viscosity resin or consult on material selection. For chronic issues, redesign the mold to minimize thin sections or flow hesitations—prototype changes if needed.
