Shenzhen Alu Rapid Prototype Precision Co., Ltd.
Industry News
- Home
- News
- How to fix splay injection molding?
Splay (also known as silver streaks) is a common cosmetic defect in injection-molded parts, appearing as off-color streaks, splatters, or hazy areas on the surface. It typically results from moisture vaporizing in the melt, material degradation due to heat, or excessive shear during processing. Identifying the root cause—moisture, heat, or shear—is key to fixing it, as symptoms vary (e.g., inconsistent streaks for moisture vs. location-specific for shear).Below, I'll outline the main causes and targeted solutions, drawn from industry troubleshooting guides. Always start by verifying material dryness with a moisture analyzer and inspecting the process systematically.
1. Moisture-Related Splay (Most Common Cause)
Moisture in the resin turns to steam during molding, creating bubbles that burst and leave streaks. This often shows as foamy purge material or inconsistent splay across the part.
Solutions:
Dry the material properly: Extend drying time to the resin manufacturer's recommendation (e.g., 2-4 hours at the specified temperature). Drain the first 25 lbs from the dryer cone at startup to remove any moisture-laden material. Use a larger dryer if production rates exceed its capacity (e.g., aim for 300+ lb capacity for high-volume runs).
Check dryer performance: Ensure supply air matches the setpoint temperature and return air is no more than 20°F cooler. Install temperature probes on air lines to monitor. Avoid over-drying, which can degrade additives—bank the dryer at ~100°F during downtime longer than 4 hours.
Prevent reabsorption: Drain 25 lbs from the feed throat at startup. Keep dried material covered and process it within 1-2 hours. Inspect for mold leaks (e.g., water fittings) and repair them to avoid introducing moisture.
Quick test: Run a dry purge; if splay disappears, moisture is confirmed.
2. Heat-Related Splay
Excessive heat degrades the polymer, shortening molecular chains and causing volatile gases that form streaks. Look for burning smells, sticky residue, or splay covering the entire part.
Solutions:
1.Lower barrel temperatures: Gradually reduce to the lower end of the manufacturer's melt temperature window (e.g., drop 10-20°F at a time, waiting 20 minutes for stabilization). Run the feed zone cooler to minimize initial heat exposure.
2.Reduce back pressure: Lower settings to the minimum needed for mixing (e.g., 100-200 psi), allowing time for shear and temperature to settle. This prevents overheating in the compression zone.
3.Control residence time: Adjust screw recovery so it finishes 1.5-2 seconds before mold cooling ends. Use a screw-rotate delay for long cycles to avoid material sitting in the hot barrel. Ensure shot size is reached just before mold opening.
4.Verify temperatures: Confirm actual barrel and mold temps match setpoints (no swings >10°F). Balance nozzle and mold temps to avoid abrupt cooling.
3. Shear-Related Splay
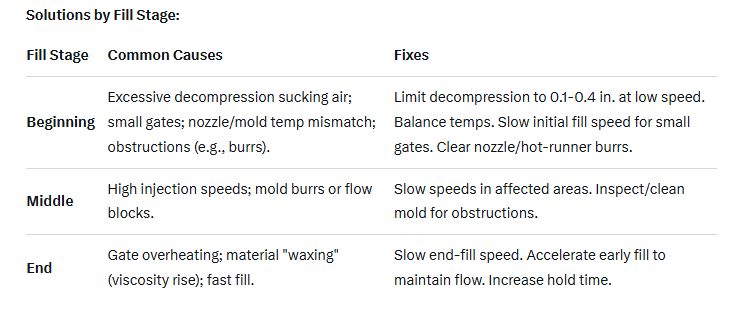
High shear from fast flows or restrictions heats the material locally, creating splay in specific locations (e.g., near gates). It's repeatable and tied to fill stage.

General Troubleshooting Tips:
1.Purge and inspect: Run purges at different speeds/temps to isolate the cause (e.g., foamy = moisture; consistent location = shear).
2.Material checks: Confirm resin batch quality—no contamination or wrong grade. Switch lubricants if over-lubrication is suspected (e.g., use lighter rust preventatives).
3.Process tweaks: Increase injection speed and hold time to push out volatiles; raise mold temp slightly for better flow.
4.When to seek help: If fixes don't resolve it, consult a process engineer or test with a different resin lot.
