Shenzhen Alu Rapid Prototype Precision Co., Ltd.
Industry News
- Home
- News
- How to get rid of splay in injection molding?
Splay, also known as silver streaks or splash marks, is a common cosmetic defect in injection-molded parts. It appears as off-color streaks (often silver or white) on the surface, typically caused by moisture in the material, excessive heat, high shear rates, or contamination. Identifying the root cause through visual inspection (e.g., location of streaks, purge analysis for bubbles) is the first step to fixing it.
Primary Causes
Moisture: The most frequent culprit—material absorbs humidity, vaporizing during molding and creating steam pockets.
Heat: Overheating in the barrel, nozzle, or from excessive residence time degrades the material.
Shear: High injection speeds or restrictions create turbulence and air entrapment.
Contamination/Obstructions: Tramp metal, burrs, or over-lubrication in the mold or machine.
Step-by-Step Solutions
Address splay systematically: Start with material drying (most common fix), then adjust machine settings, inspect the mold, and verify processes. Allow 20 minutes for temperature/shear changes to stabilize before evaluating parts.
1. Dry the Material ProperlyDry all resins (even non-hygroscopic ones) per supplier specs: Aim for 0.005–0.01% moisture content using a dryer with -20°F to -40°F dew point air.
Solutions:Run the dryer longer at the recommended temperature; drain the first 25 lbs from the hopper to purge undried material.
Check dryer function: Supply line should be hot, return line warm (within 20°F of setpoint). Upgrade to a larger dryer if throughput is too fast (e.g., ensure 5-hour drying cycle for 4-hour spec).
At startup, drain 25 lbs from the feed throat to remove material that sat too long.
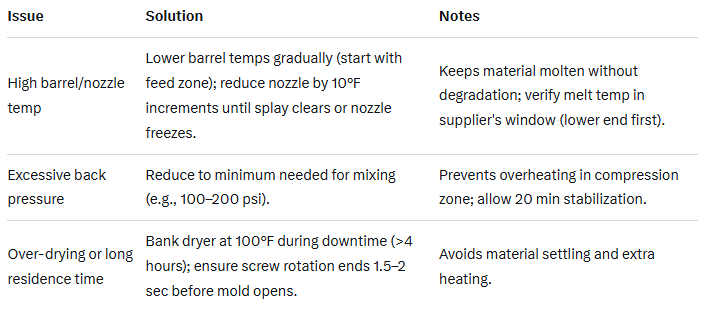
2. Adjust Machine Temperatures and Pressures

3. Reduce Shear and Optimize Fill Speeds
Slow injection speed, especially the last 10–20% of fill (e.g., drop to 50% of initial speed).
Limit packing/holding velocity; increase gradually until splay reappears.
Check nozzle diameter (larger for viscous materials); reduce suckback/decompression (0.1–0.4 in. max).
When to use: If splay is consistent in the same spot (e.g., end-of-fill indicates gate overheating).
4. Inspect and Clean Mold/Machine
Gate/Runner Issues: Enlarge gates if too small; polish burrs or obstructions. Use supplier data or FEA for sizing.
Obstructions: Purge 20+ shots with purging compound or scrapped acrylic to clear tramp metal/volatiles.
Mold Leaks/Cracks: Fix water fittings; repair cracks (weld or insert tubing in cooling channels).
Contamination: Drain regrind or additives; use anti-splay additives for over-lubricated materials.
When to use: If splay appears suddenly after maintenance or in specific flow paths.
5. Process and Operator Best Practices
Run on automatic cycle to avoid inconsistencies; train operators on cycle importance.
Use a larger press for shot size (ideal 20–80% barrel fill) to minimize degradation.
Monitor with tools: Moisture analyzer, temp probes in hoses, and part inspection logs.
